
Operational steps at the latitude (optical pairing)
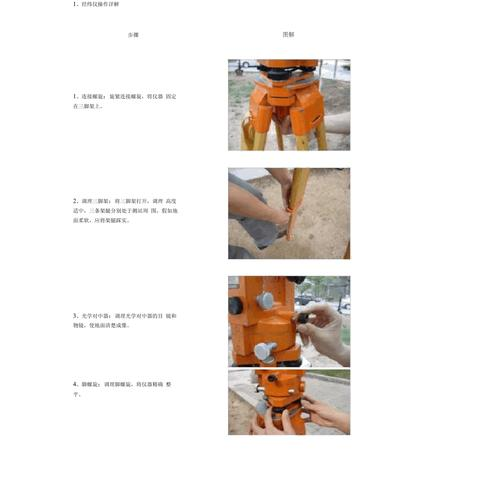
1. Installation of instruments:
Placing the lycée on top of the shelf so that the head of the shelf is roughly horizontal and closely connected to the spiral。
2. Positive:
The purpose is to place the instrumentation centre on the same lead line as the station. It is possible to move the scaffold, rotate the helix, so that the intermediate sign is precisely directed to the centre of the station。
3. Complete:
The purpose is to provide instrument vertical axle lead and horizontal plate levels. The horizontal angle is defined as a projection of the angles on the horizontal side of the two orientation lines, so that the horizontal compass must be horizontal。
Crude flat: stretching the leg so that round-level bubbles are in place。
Check for accuracy: check if the intermediate sign deviates from the ground point. If it deviates, the connecting spiral on the tripod, and the smoothing of the instrument base allows the medium sign to be precisely directed to the centre of the station and to tighten the connection spiral。
Equivalent: rotation of foot spirals, placing pipe-standard bubbles in the middle。
4. Aim and read:
A lens to the light: the lens focuses the crosses。

2 aims and mirrors to light: coarse aim, object focus clear. Watch out for the blind. Aim at the target。
Three readings: adjust the light reflector so that the reading window is moderately bright, and the mirrors for the rotating reading microscope make the lines clear and then read。
Use of the full station (presentation of the topcon station)
(1) pre-measurement preparation
1) battery installation (note: before measurement battery needs sufficient power)
1 inserts the lead block at the bottom of the battery box into the lead hole of the battery。
2 press the top of the battery cartridge until the sound of the thorium is heard。
3 press the unlocker and remove the battery。
2) placement of instruments。
1 select one point on the experimental site as a station and two other points as an observation point。
2 place the whole station at point, medium and flat。
3 place the prism at two points。
3) setup of vertical and horizontal disk indicators。
1 vertical disk indicator setting。
The vertical diameter brake button is released and the telescope is rotated for a week (the telescope is left on the disc, when the mirror passes horizontally), and the vertical diameter table is set. It then heard a sound and showed a straight angle。
2 horizontal table indicator settings。
Unlock the horizontal brake spiral and rotate to the level 360, and the horizontal table indicator is automatically set. Then there was a sound and a horizontal angle. Up to this point, vertical disks and horizontal disk indicators have been set. Note: every time an instrument is turned on, the indicator must be reset。
4) focusing and targeting。
The operational steps are the same as the general longitudes, and care is taken to eliminate the vision。
(2) angle measurement
1) first determine whether it is in an angle measurement mode from the display screen or, if not, convert it to a distance mode by operation。
2) aim left to the left target a, press zero, so that the reading of the horizontal disk is 0° 00 ' 00 ', rotate the clockwise to the point, target the right target b, and read the display reading。
3) the same method allows right-hand observations。
4) if the vertical angle is measured, the display of the vertical disk can be read at the same time as the horizontal disk。
(3) distance measurement
1) first, determine from the display screen whether it is in the distance measurement mode or, if not, converts the action key to the coordinates mode。
2) the centre of the prism is then shown with the animation that shows the arrow forward, and the coordinates are measured at the end of the march, resulting in distance, hd is horizontal and vd is tilted。
(4) coordinate measurements
1) first, determine whether the coordinates are in the measurement mode from the display screen or, if not, convert the action key to the coordinates mode。
2) enter the coordinates of the o-point and the rear-vision point, as well as the height of the instrument and the prism。
3) aim at the centre of the prism, showing the animations on the screen that show the forwarding of arrows, and at the end of the march the coordinates are measured and the coordinates of the points are derived。
Iv. Notes
1) transport instruments shall be transported and moved in the original packaging。
2) when the instrument is moved together with the tripod at a close distance, the instrument shall remain vertically up。
3) the plug should be removed before it is turned off. During the measurement process, data may be lost if plugs are removed。
4) the battery must be switched off before being replaced。
5) instruments can only be stored in dry rooms. When charged, the surrounding temperature should be in the range of 10-30°c。
6) the whole station is a sophisticated and valuable measurement instrument designed to protect against sun sun, rain and rain and collision shocks. Instruments are strictly forbidden to direct the sun。