


Comfyui joins blender to seal the gods! Sensor
Have you ever had a 3d creation of treasures
The night-to-night modeling and displaying of uvs in blender was designed to make a texture map of the fit-up scene, resulting in several hours of manual drawing, and the details were twisting and twisting; the 3d role was to be given an arousal background to switch back and forth between blender and ai tools, copying paste, changing formats, and losing all of its creativity to these cumbersome operations; and the idea of a good model had been stuck in material generation, photo-regulation, and final product and expectations by 18,000 miles。
If you're also troubled by these problems, today's dry product will save you from the fire - comfyui joins blender, completely removes the barriers to ai generation and 3d modelling, and seamlessly integrates ai's high-efficiency generation into the 3d workflow, so it can be done in a few hours now, and newers can easily produce professional works
First of all, it is not a common ai generation tool: comfyui is an ai engine based on nocturnal logic. It is an ai engine that does not fill out forms, is created without a single key, but, like building blocks, makes the steps of text coding, sampling, decodering, etc., into stand-alone nodes. Draging the connection allows for customization of the exclusive generation logic and full freedom; and, as an open source 3d device, blender is a set of 3d creators, which is an essential tool for modelling, rendering and regulating materials。
These two tools can be used alone, but it's the real king's bomb group that works together. It addresses the pains of the "dependency" of the ai tool and the 3d software, so that the ai generation is no longer an isolated "image output" but is deeply integrated into every link of the 3d creation, from texture pasting, environmental background to methodical depth, seamlessly linked throughout, preserving the precision control of blender and freeing hands with the capacity of the comfyui。
Why is comfyui+blender the "efficient ceiling" created by 3d
Many have tried to import blender using ai-generated material, but mostly “manual handling”, which is not only a problem, but also a problem of inconsistent styles and incorrect detail. And the comfyui-blender connection made it possible to “generate within the context” and to call on ai without leaving the blender interface to truly “sweetly connected and manageable”。
To give one of the most practical examples: former line-ups for 3d model practices, manual drawings to adjust cavity details over and over again and to fit the geometric structure of the model, with minor errors in detail; now using comfyui to connect to blender, simply bake a position map in blender, import the comfyui, add the controlnet node to guide the ai generation, and in a few seconds, produce a code-chart to fit the model, precise details, and a single key to import the blender mass node tree and save all manual adjustment problems。
In addition to this, the combination has three crushing advantages, which the newcomers must see:
1. Zero threshold, without complex configuration

Many people think "connection" is a complicated code operation, but it's not necessary! There are readily available comfyui-blender plugins (e. G. Comfyui-blender bridge) that can be configured in a few simple steps:
1 install cofyui with a custom node to open the listening mode on startup; 2 install a connection plugin for blender to fill out the cofyui server address in the preference setting;3 create a workflow in cofyui to export to api format and import blender to call. You don't have to write complex codes for the whole trip, and the rookies follow the steps, and the connection can be done in five minutes。
Also, plug-ins support the deployment of equipment across borders, and even if comfyui and blender are not in the same computer, they can be connected through network connections, with full flexibility。
2. Reusable work flows and doubling of team effectiveness
Comfyui's nodalized workflow can be saved as a json file, and once a set of configurations suitable for a given scene (e. G. Stone wall mass, role skin texture) has been deciphered, others simply need to load the file, enter a corresponding hint to reproduce the same result, no longer have to transmit their experiences by means of a screenshot or oral description, and team collaboration efficiency is simply doubled。
For example, you debug a set of "film scene background generation" workflows, which team members need to call in in blender and enter "sabbonk city nightscape, film-class photo, 8k resolution" to quickly generate the background of the adhesive model, to be consistent in style, and to save a lot of time for repeated debugging。
3. Low- and medium-sized computers can also run smoothly, with no frames and no spills
Many fear that the ai connection will take on a large amount of visibility and that ordinary computers will not be able to handle it. However, comfyui itself is lower than the traditional ai tool display. It also supports a needs-loading model, cpu/gpu flexible switching, and even low- and medium-end cards such as rtx 3060 can stabilize the sdxl model generation mission under conditions lower than 6gbs。
And during the connection, comfyui will be smart to clean up the memory cache, avoid oom problems, without upgrading the hardware, and be able to move through the ai+3d connection, and no newer will have to worry about “not having enough computer configuration”。
Clean-up: 3 moves to get comfyui to join blender
Having said that, many treasurers must have wanted to know how to do it, and here you can sort out the simplest practical steps, without complex configurations, to make a connection (in the case of "ai generating textures and importing blender"):
Step 1: linking environment (key step, yes)
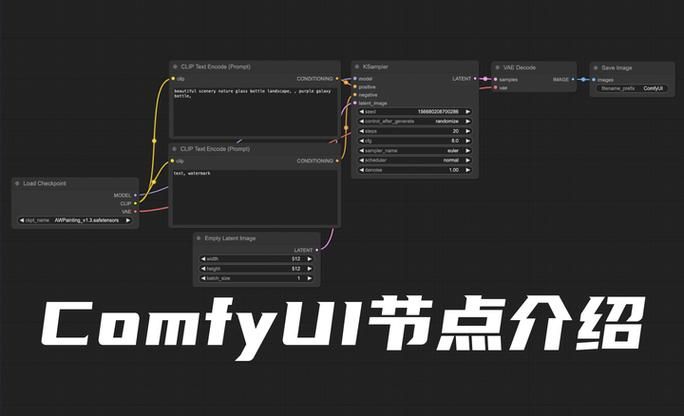
1. Installation of comfyui (recommended to use the latest version to support more associated nodes) and installation of comfyui-blender custom nodes (through the comfyui manager, or to clone the warehouse to the custom nodes folder)
2. Installation of the blender (recommended to be more than version 3. 5, compatible with the connection plugin), downloading and installing the comfyui-blender plugin and filling out the comfyui server address in the plugin preferences (default: http://127. 0. 0. 1:8188)
Commyui is activated to ensure that the server is running properly, and the “connection success” is shown in the blunder plugin, and the enabling environment is completed。
Step2: create an exclusive workflow in comfyui
1. Open comfyui, create new workflows and add required nodes (e. G. Clip text encode, ksampler, vae decode, controlnet, etc.)
Configure node parameters: enter positive node in text coding node (e. G. "quality skin texture, fine hair hole, natural light, 8k resolution") and inverted node (e. G. "small, low resolution, malformation"); import blender baked position maps in the controlnet node to guide ai to produce textures for matching models
3. Test the workflow, confirming that the production effect is correct, and export to the api format (top menu filtering file export (api))。
Step3: call ai generation in blender, one-click application
1. Opens the blender, loads 3d models that require texture addition and expands the uv (to avoid texture errors)
Press shortcut n to move out of the sidebar, find the comfyui panel, and import the previously exported workstream json files
Adjusting input parameters (can modify hints, resolutions, etc.), clicking on " run the workflow " , ai automatically generates texture maps and directly imports the material nodes of blender
4. Micro-modulation parameters, photo-effects, with texture additions in minutes, 10 times faster than manual mapping

Here is a small technique for you: to create textures using as much as possible the textures of the blender baked depths and the method maps as can be entered into the controlnet, so that the textures generated by ai fit more closely the model structure and avoid the problem of " textures out of touch with models"。
A guide to pit avoidance: new hands must move, 90% less turn
Many newcomers encounter problems for the first time, where three of the most common pits have been sorted out, avoided in advance and worked efficiently:
Pipe 1: workstream import failure is probably due to incorrect json file formats, which must be exported in comfyui instead of regular json; and check whether comfyui and blender plugin versions match and the old versions are prone to compatibility problems。
Pipe 2: generate texture mismatches and forget to display uvs in blender, or overlap with uvs; solution: start with the uvs, make sure there are no overlapping areas, then import the contronet guide。
Pipe 3: computer cardon, visible spill, without loading multiple large models at the same time, can set up a “demand loading model” in comfyui, switching non-critical nodes (e. G. Vae decoded) to cpu operations to relieve gpu pressure; and avoid using absolute path-storage models, suggesting that compatibility be enhanced by relative paths or environmental variables。
In the end, it's the ai+3d era that unites the king
The trend of 3d creation is no longer “one-on-one”, but “ai empowerment + tool link”. Comfyui's nodal flexibility, combined with the 3d full-process capability of blender, not only frees hands, saves a lot of duplication of effort, but also frees creativity from technical constraints -- – details that could not be done before, styles that could not be tried, and now a combination of them can be easily achieved。
Whether you're a 3-d rookie or a senior creator, the linkage approach will help you improve efficiency and quality. It is the core of the 3d creation that more time is devoted to creativity without the need to stay up late in the liver model, hand-drawing texture。
And i'm going to keep updating comfyui's blender progression skills, like using ai to generate 3d models, dynamic scenes, etc., to focus on me and unlock the new possibilities of 3d creation
The comment section says, "what's the most painful problem when you usually write it with blender?" have you tried comfyui